
I have been working on so many things that i just haven't been able to pull down the images and make them blog worthy!!! But here they are finally... !
So recently i have been super inspired by cards: all cards... wedding invites love cards happy birthday cards tags for gifts,basically anything to do with mixing lovely papers and paints and flowers!!! So i started with the simplest: A Gift Tag.
I made four kinds and i'm also planning on selling these (See how i slide that one in!!!) So here's how you can make them, but if you don't have the patience give me a call!!!

Happy Polka Dots!

Vintage mish mash!

Flowery flowers!

Classic Vintage!
Lets start with the first one!!!

So first of all use a round object and trace that onto the card paper. And cut along it.

Glue a piece of jute ribbon. I recommend taking a longer strip sticking it and then cutting the edges to fit. Its much neater that way. Be aware that the jute threads keep fraying so be careful!
Paint the top half a bright color!

Fix the ribbon leaving a gap. Again take a longer strip and then cut it to shape.

These are all the cards with the ribbons! looks cute huh?!!


Now cut the excess ribbon along the circle to get your shape.

Next come the punching. This is important. Don't punch too close to the edge as it can tear when you put in the ribbon or jute to tie it to your gifts.
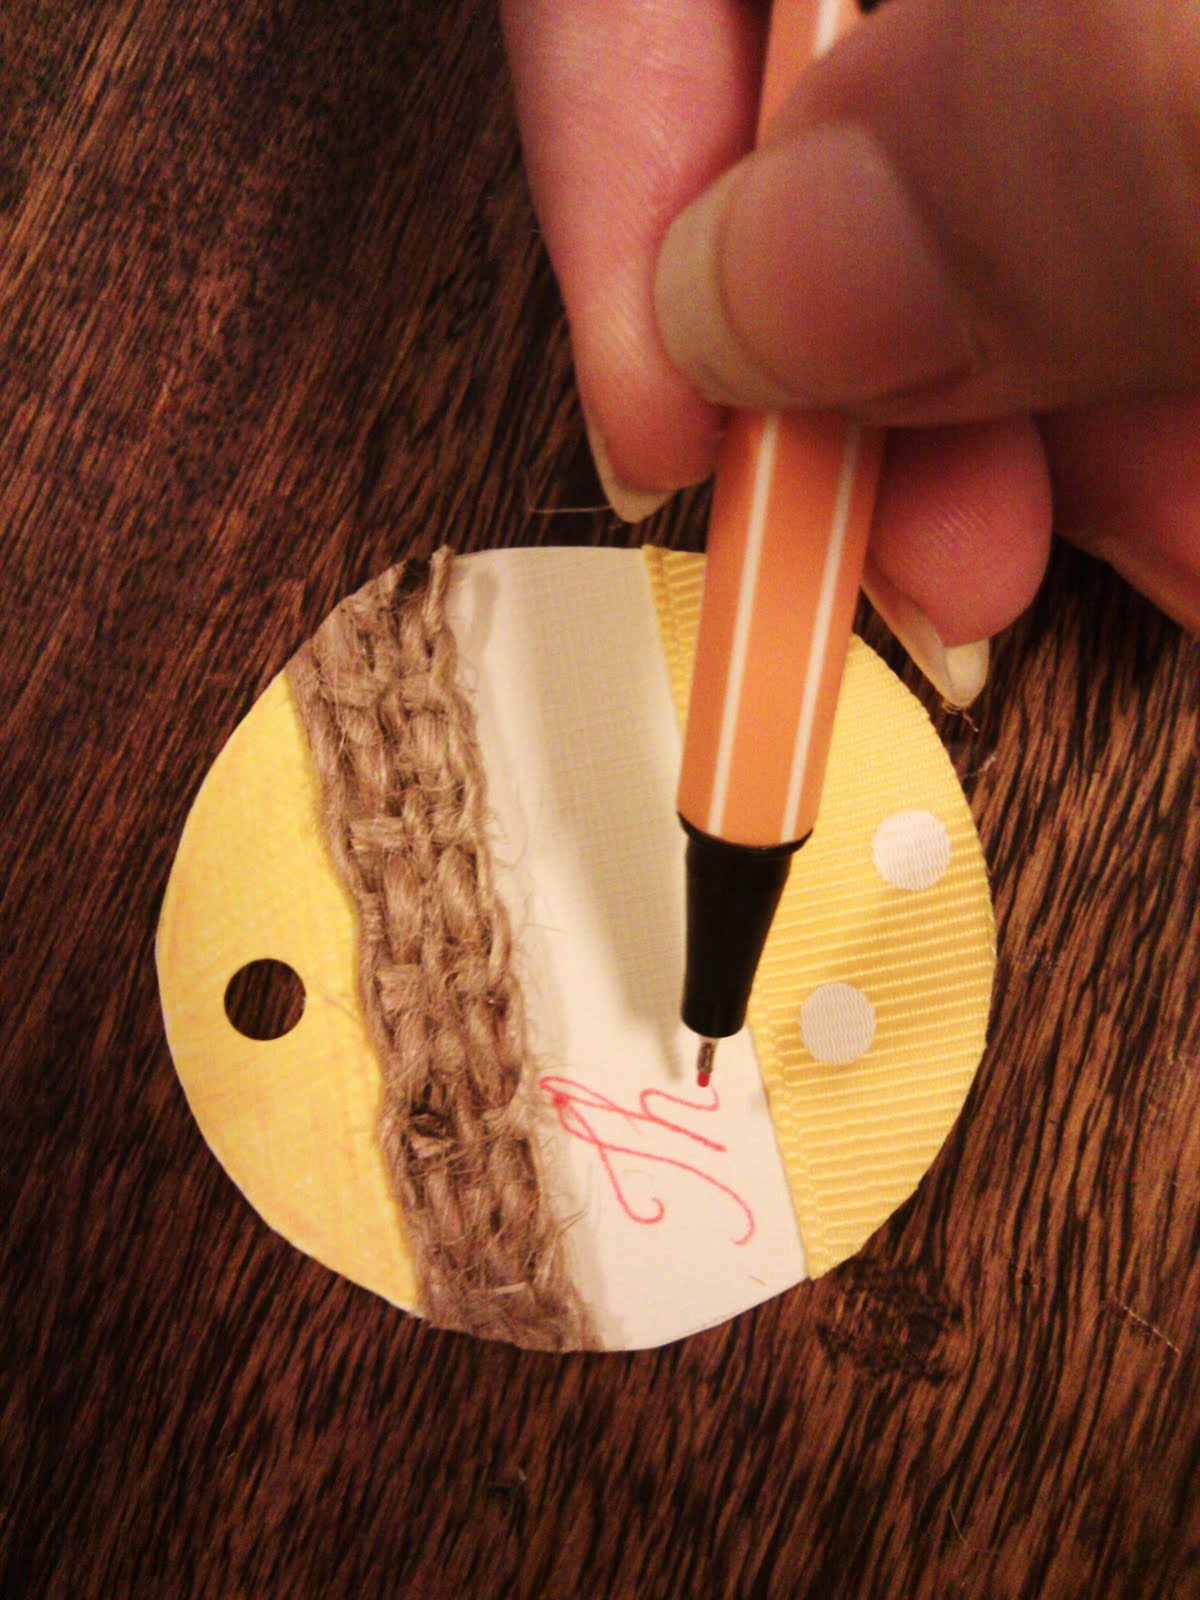
Write in a very neat handwriting. Or better still i suggest you print out the words you want and stick it onto the cards. It will be much neater!!!

Ta-da your gift tags are ready!!!

Tie a little just thread to it to finish it up!
Next!!!!

First off paint some paper doilies. Paint extra since they could tear later.

I picked a bright blue and red palette. I used water colors and tried to get some nice shading done.

So painting directly onto my drawing board: Not such a smart idea!! The paper got so badly stuck to the board that i had to literally dry them off!!! I suggest you try to do the painting over a plastic sheet so that it doesn't get stuck and let it dry patiently for at least 4 to 5 hours.
In the mean time cut your card paper to the size of your gift cards. Paint tea water over them to get a washed out effect. And if you still have time do another project in between!!!

Once the paper doilies have dried, place them on your gift tags and see what kind of placements and designs work for you.

I placed all details like the doilies, the small patterned paper circles as well as the jute ropes, before i started to glue them on.

These are the final gift tags! the polka dotted paper as well as the flower patterned paper i printed onto regular printing paper, cut them in circles and strips and used them here.

Punch a hole on the top center, be careful it isn't too close to the edge.

And string a pretty ribbon into it! and there you have it!!!! by the way you can use these as book marks as well!
The best one!

So this is a long project. Only start if you can finish!!!
Start by cutting up your papers into a slim long size.

Dip into tea water (i added a little brown color to it) hold for a while and watch the color seep into the paper. Once it reaches about halfway pull it out. This way you get a sort of shaded card.

LET IT DRY!!!! this could easily take up to like 5 to 6 hours. keep checking and keep away from ants!!!!

Once they are dry, cut up newspaper of a decent size and stick it onto the cards front and back. Use fevicol mixed in water for a smoother less messier application. Also with a brush, brush some of the mix on top as well to secure it.

I used tea stained doilies as well. Glue them on like you did the paper.

String some pearls into some wool and wrap it around the card. Sticking the ends of wool are extremely painful. So take your time, put the glue and hold it steady for a while.
Now add your embellishments. I used some metal butterflies, and green flowers to give it a very vintage feel.

001

002
003

004

005

006

Now does't that look like a pretty little set?!!
This last one is really simple. It hardly needs a tutorial.

First off cut small squares. Around 3" by 3"

Using any colored sketch pens, make flower designs all over it.

Use different designs to add to the fun!!
Now add a small crepe paper flower to one corner and punch a hole in the other!!
Ta - da once again!!!!

And that ends my work of weeks!!!! ha ha ha... so many days and just one post!!! I love what i do!!!
But on a serious note... i am planning on selling these pieces and they can be custom made with names of friends or loved ones. You can use these as gift tags for birthdays, wedding gifts anything you like. You can even use them as bookmarks. So if you want some, post a comment or send me an email!
love!
ps: once again i apologize for the quality of the images. Had to use my phone camera for most of them!!!
This one is one of my favorites... you have done so much with just cards....
ReplyDeleteand each one so unique and cool... Love it!!